Like most people, you probably switch on subtitles whenever you’re struggling to understand the content on your Firestick or laptop. That’s why it’s important to learn how to add subtitles to Kodi so you can enjoy your favorite TV shows or movies without missing out on anything that’s going on. The great thing about Kodi is that it allows you to activate subtitles for all types of video content through various online services. So you can rest assured that you’ll be able to access the right subtitle for any and all of your video content.
Setting Up Subtitles on Kodi
Here are the simple steps you have to follow if you want to add subtitles to Kodi:
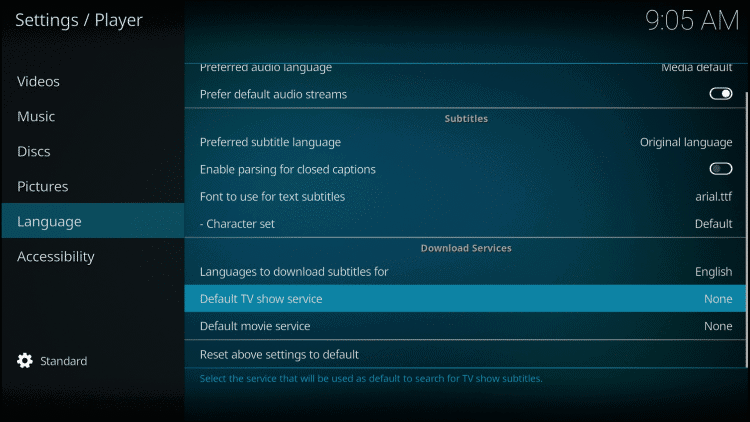
- Open Kodi, go to the top-left corner of the page and select the gear icon which will take you to the Settings page. Once there, select “Player.”
- Hover to the sidebar on the left-hand side of the page and select “Language”;
- You’ll notice a number of options on the right-hand side of the screen. Go to the “Download Services” section.
- Select the options titled “Languages to download subtitles for” and then select your chosen language. While there’s a long list of languages to choose from, most people will opt for English.
- Click on the option titled “Default TV Show Service” to activate a new pop-up;
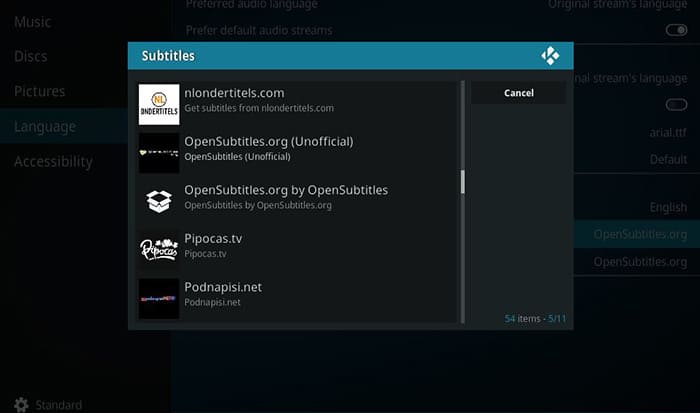
- Choose the option which says “Get More” to see all the available subtitle services;
- We recommend OpenSubtitles.org because it’s the easiest to use.
- Once you click on “Default movie service” you’ll be able to view your selected subtitle service.
- Then, select “OpenSubtitles.org.”
- Lastly, register for an account on OpenSubtitles.org in order to enable the service.
That’s pretty much all you need to do to activate subtitles on Kodi. From now on, you’ll see subtitles every time you watch video content on your Kodi through a Fire TV Stick or any other device.
Attention: Read before you continue
Governments and ISPs across the world monitor their users online activities. If found streaming or browsing content on your Fire TV Stick, mobile or PC, you could get into serious trouble.
Currently, the following information is visible:
- Your IP:
- Your Country:
- Your City:
- Your ISP:
If this is your real information, you need to use a VPN to protect your identity.
We strongly recommend you to get a good VPN and hide your identity so that your online experience doesn’t take a bad turn.
We use IPVanish which is the fastest and most secure VPN in the industry. It is very easy to install on any device including Amazon Fire TV Stick. Also, it comes with a 30-day money-back guarantee. If you don’t like their service, you can always ask for a refund. IPVanish also runs a limited time offer where you can save 74% on your VPN and they allow you to use one account on unlimited devices.
This is a flash sale that can expire at any time!
Get an OpenSubtitles Account

You might need a bit of help registering an account on OpenSubtitles.org so you can use it to add subtitles to Kodi.
- Open your web browser and visit OpenSubtitles.org
- Click on “Register” which should appear on the top-right corner of the page next to the website’s logo.
- Fill in the required information and click “Register”;
- The service will send you a confirmation email which should appear in your inbox within a few minutes. Click on the link provided in this email to kick-start the activation of your account;
- Then, log into OpenSubtitles.org using the credentials you created during the registration process, and enjoy!
Now that you’ve activated your account on OpenSubtitles.org, you’re one step closer to adding subtitles to Kodi. The only thing left to do is access the OpenSubtitles add-on from your Kodi.
Read on to learn how to do this:
- Open Kodi, go to the main menu and select “Add-ons”;
- Use the cursor to choose the “My Add-ons” option on the left-hand side of the menu;
- Select “Subtitles”;
- Click on the OpenSubtitles.org button, which should be the only option made available to you here.
- Select “Configure”;
- Input your Username and Password in the provided fields;
- Click “OK”
Activating Subtitles on Kodi

Well, there you have it! You’ve now added subtitles to your Kodi. Next, we’ll share with you how to activate the subtitles so that they appear every time you watch a video on your Firestick, Fire TV Stick or any other device.
- Choose any video that you’d like to watch and open it. You could stream a shown online or watch a movie that’s stored in your offline library.
- On the bottom-right corner of the page, you should see an option titled “Subtitles.” Click on this button as soon as the video starts.
- Next, select the “Download” option to activate a pop-up;
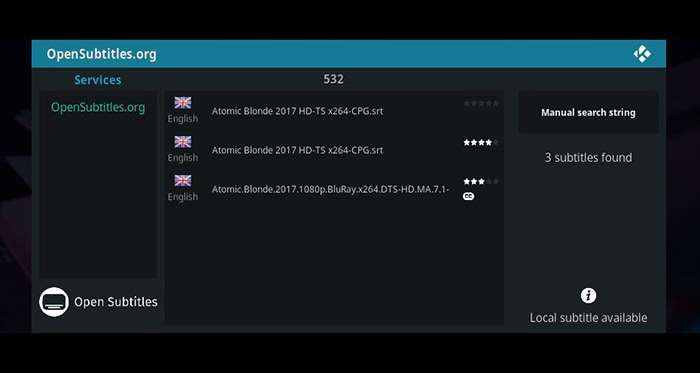
- From here, OpenSubtitles.org will automatically scan its library for suitable subtitles. Select your preferred subtitle language to activate it.
- Then again, you could always manually search for subtitle options by clicking on the option; “Manual Search String”;
- Next, input the movie title and click on “OK”
- This will activate a pop-up with a number of options to choose from. Select the subtitle with the language you understand and the service will automatically load it onto your movie.
- You’re done! That’s how you add subtitles to Kodi Leia while watching a video.
We hope we’ve made it much easier for you to add subtitles to Kodi Leia so you can enjoy your favorite TV shows and movies or explore new types of content in different languages while knowing that you’ll be able to understand it. We know it’s not exactly easy but following a step-by-step process does simplify it a bit.
Let us know in the comments section below if you used our tutorial to add subtitles to Kodi and how it worked out for you!


