Wireless routers have become an essential item in every household and office connected to the Internet. However, it can be quite infuriating when you pay for high-speed internet but your connection still remains unbearably slow. This is even worse if you don’t know how to boost Internet speed. Wi-Fi dead zones or that little annoying buffering symbol can easily send you into a bout of rage.
Wi-Fi can also be quite temperamental. You may be getting a perfect signal in one spot. But as soon as you move to another spot it becomes ridiculously slow and when you get back to the original spot it becomes sluggish again.
When you have temperamental Wi-Fi, it is imperative to fix your connection and speed to enjoy all the benefits of a Wi-Fi connection.
In this article, we will show you how to boost Internet speed using a trick that will not cost you a cent.
How to Boost Internet Speed
To ensure that this method works, start by downloading or using any speed test app such as speedtest.com. You can use these tools to check your current Internet speed before you attempt to boost it.
Download and Install the NETGEAR Wi-Fi Analytics App

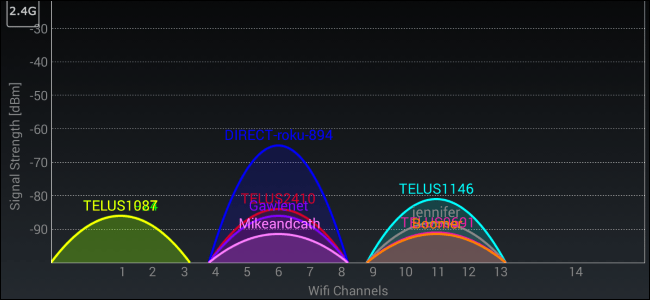
Just click on the icon and the app will identify all the available networks including the one you are currently connected to. One thing you’ll notice is that all the networks are using the same channel, which means everyone in your range is fighting for Wi-Fi connection on the same channel. Such overcrowding on one channel is not a good thing. You have to avoid that if you want to know how to boost Internet speed.
Attention: Read before you continue
Governments and ISPs across the world monitor their users online activities. If found streaming or browsing content on your Fire TV Stick, mobile or PC, you could get into serious trouble.
Currently, the following information is visible:
- Your IP:
- Your Country:
- Your City:
- Your ISP:
If this is your real information, you need to use a VPN to protect your identity.
We strongly recommend you to get a good VPN and hide your identity so that your online experience doesn’t take a bad turn.
We use IPVanish which is the fastest and most secure VPN in the industry. It is very easy to install on any device including Amazon Fire TV Stick. Also, it comes with a 30-day money-back guarantee. If you don’t like their service, you can always ask for a refund. IPVanish also runs a limited time offer where you can save 74% on your VPN and they allow you to use one account on unlimited devices.
This is a flash sale that can expire at any time!
What You Do Next to Get Out of the Crowd?
How to Change Wi-Fi Channel
To change channels, go to your computer and log into your router’s admin console via the IP addresses provided by your router’s manufacturer.
While still at Wireless Setup, go to your DNS Settings and change from Default to Cloudflare New DNS. Put 1.1.1.1 into the primary DNS and 1.0.0.1 into the secondary DNS. In Google’s DNS put 8.8.8.8. These changes will give you better speed and Wi-Fi experience. Click Apply and run another test to see the difference.
When we run our speed test again, we discover that our upload speed has improved to almost 150 Mbps from the original 31.62 Mbps and our upload speed has increased from the initial 11.56 to 11.80 Mbps.
Conclusion
Drop us a comment down below to let us know if this tutorial helped you boost your Internet speed!